Context
This page describes the checklist and the technical pre-requisites for the installation of the ROOMZ On-Premise v2.
| Panel | ||||||
|---|---|---|---|---|---|---|
| ||||||
The installation cannot be started if one of the following entries is missing. |
Checklist
- Server Software
- Server Hardware
- DNS Entries + certificates
- Wi-Fi credentials
- SMTP credentials
- Internet access and whitelisting
Pre-requisites
Server Software
| Anchor | ||||
|---|---|---|---|---|
|
Operating System
(current version can be found using the command 'winver'. Windows Update could be necessary for reaching the minimal patch version) VMware Tools >= 11.0.6There is a known issue with VMware Tools lower than the version 11.0.6 and the docker networks. If VMware tools is installed on the server, please ensure its version is 11.0.6 or higher. Docker engineDocker engine must be installed and running. If Docker engine is not installed, please follow those instructions:https://learn.microsoft.com/en-us/virtualization/windowscontainers/quick-start/set-up-environment?tabs=dockerce#windows-server-1 Docker composeDocker compose must be installed. If Docker compose is not installed, please follow those instructions: Install Compose standalone Make sure to have the variable for docker in the system-enviroment variable paths: 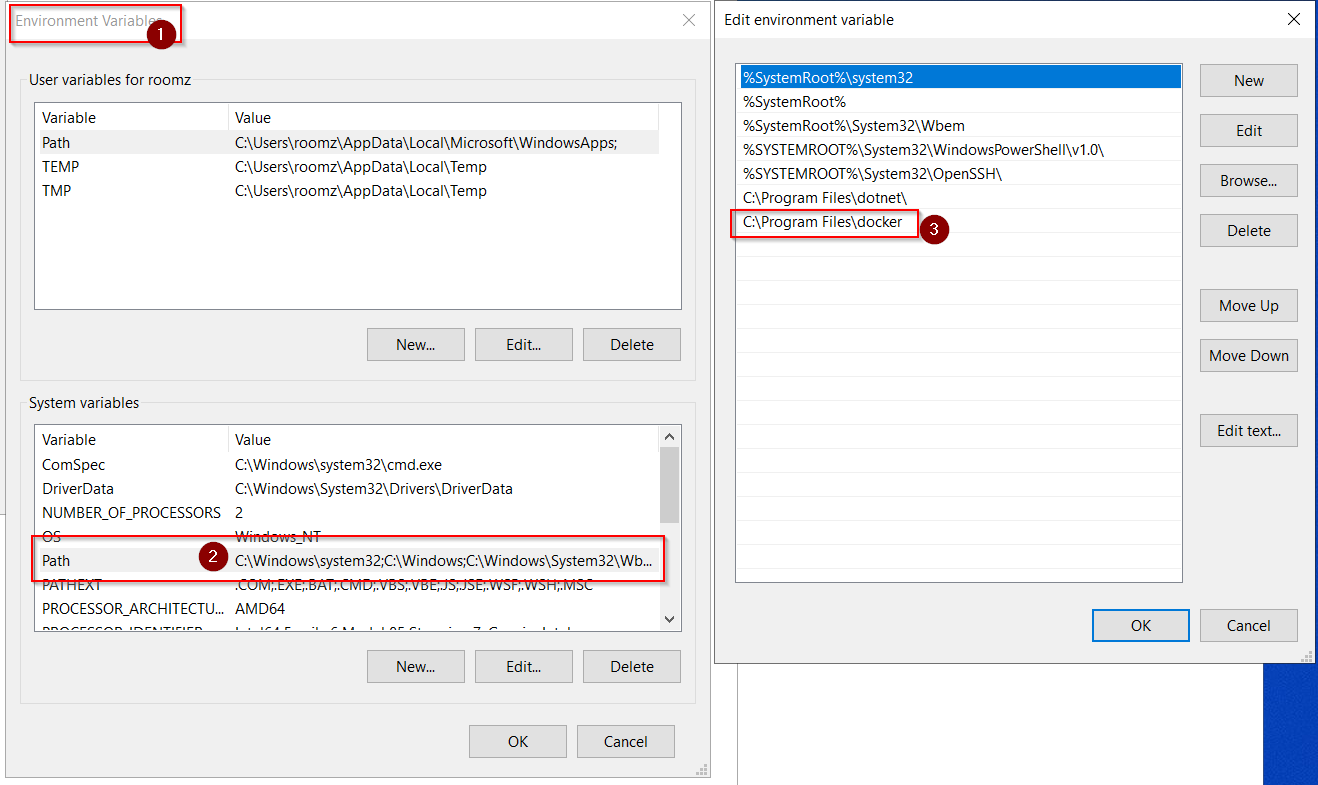 Docker and AntivirusThe antivirus and firewall must be configured in order to exclude Docker. Please follow those instructions. The following exclusions should be set at least: 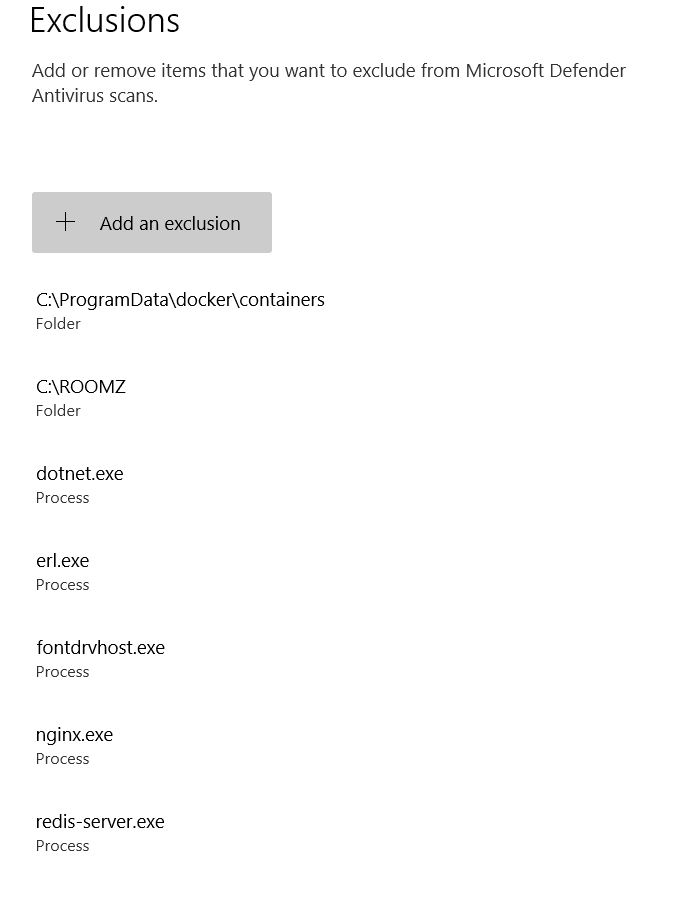 |
Server Hardware
| Anchor | ||||
|---|---|---|---|---|
|
Recommendation from Microsoft: https://learn.microsoft.com/en-us/virtualization/windowscontainers/deploy-containers/system-requirements Recommendation from ROOMZ: Physical or Virtual Machine (VM) with:
|
DNS Entries + certificates
| Anchor | ||||
|---|---|---|---|---|
|
5 DNS Entries must be added to the internal DNS Server and must redirect to the On-Premise Server For this 1st entry, ROOMZ will generate the certificate during the installation :
For those 4 entries, the organization must create the certificates inPEM Format (base64): (The self signed certificate can use a wildcard. Thus, only one certificate could be issued for all the entries. Eg: "*.roomz.example.com")
|
Wi-Fi credentials
| Anchor | ||||
|---|---|---|---|---|
|
The ROOMZ Devices will communicate with the ROOMZ Server On-Premise using the existing Wi-Fi environment. The following authentication are supported:
Please make sure you know the authentication and the credentials of your Wi-Fi. |
SMTP connection
| Anchor | ||||
|---|---|---|---|---|
|
User invitations and technical notifications are sent per email. A SMTP connection is mandatory for those 2 scenarios. Please make sure you know the SMTP credentials to use. |
Internet connection and whitelisting
| Anchor | ||||
|---|---|---|---|---|
|
Internet access is only mandatory during the installation process or during the update process. When ROOMZ Server is running, all the connection to Internet can be closed. Internet will be used for downloading the ROOMZ Docker images for the ROOMZ Docker Registry. Should you have an outgoing DNS Whitelisting, please ensure the following entries are present: ROOMZ Registry
Docker download: Please make sure there is an Internet Access. |
Content
| Table of Contents | ||||||
|---|---|---|---|---|---|---|
|
Extra
Docker behind a corporate proxy
To configure the Docker client behind a proxy, you have to configure the Docker service to use your proxy.
Certificates
| Anchor | ||||
|---|---|---|---|---|
|
Often the customer certificate is provided as PFX/P12 but NGINX doesn't support it. We have to convert the format PFX/P12 to a format more generic which is called PEM. The command line tool OpenSSL provide an easy way to explode the certificate in 2 parts, the certificate(only) and the key of the certificate which is used to make the cryptographic operations.
This is NOT MANDATORY to install the OpenSSL command line on the server, you can install it anywhere, execute the commands and move the certificate files(*.crt, *.key) to the server. |
To extract the certificate and its parents, execute the following command in your terminal, this file will contain information of your server and organization.
openssl pkcs12 -in <pfx-file-path> -nokeys -out cert.crt -clcerts -chain |
To extract the private key, execute the following command in your terminal, this file will contain the cryptographic key to make the SSL handshake between the server and the clients.
openssl pkcs12 -in <pfx-file-path> -nocerts -out cert.key -nodes |
Once the files(*.crt, .key) moved to the server, in the ROOMZ certificate folder(e.g. C:\ROOMZ\Certificates), replace each files by your files(*.crt, *.key).
Which files should be replaced to use my SSL certificate
All ROOMZ certificates are in the folder ROOMZ\Certificates, which is often C:\ROOMZ\Certificates. |
By default, you should replace the files login-cert.crt, login-cert.key, portal-cert.crt, portal-cert.key, portal-api-cert.crt, portal-api-cert.key, viewer-cert.crt, viewer-cert.key and set your certificate password in the files login-cert.pass, portal-cert.pass, portal-api-cert.pass, viewer-cert.pass by your certificate files(*.crt, *.key) extracted using OpenSSL.
Windows SQL Authentication
ROOMZ On-Premise uses a SQL Database, which will be installed during the setup. If you wish to use the Windows Authentication, you have to follow those steps in your domain controller. The steps will create a file containing metadata of the provided gMSA name as the computer account for the container. Copy the generated file into the host folder |
SQL Database size
The SQL Database will grow from approximately 20MB every year by workspace.
We suggest a database size of 5GB on premise.
SMTP Server
ROOMZ needs an access to your SMTP server to send invitation for the new users created in the portal. To test the SMTP configuration before adding it into the .env file on your server, you can test the settings using the following command.
| Code Block |
|---|
docker run -it --rm roomz.azurecr.io/roomz/testsmtp:ltsc2022 <host> <port> <sender> <recipient> <useSsl> [<username> <password>] |
To have more information about the arguments, type the following command without arguments passed to the tester.
| Code Block |
|---|
docker run -it --rm roomz.azurecr.io/roomz/testsmtp:ltsc2022 |
Example
| Code Block |
|---|
docker run -it --rm roomz.azurecr.io/roomz/testsmtp:ltsc2022 smtp.domain.com 547 sender@domain.com recipient@domain.com false myUserName myPassword |
Web browser compatibility
To ensure best performance of ROOMZ, please make sure to always have the latest version of your web browser installed on the machine accessing to the portal
ROOMZ is compatible with the following browsers:
Chrome
Firefox
Edge Chromium
Offline installation
Download
Docker
Please follow the instructions from the online selection on top.
ROOMZ
Download the ROOMZ archive containing the images from a computer with an internet access, copy the archive on your server, unzip the archive on your server and import the images by executing the following commands where the images are.
The ROOMZ Archive is not available to download on the portal and can only be provided by ROOMZ |
Install
An instance of SQL Express is included in the container. The next steps assume that you are using this default instance and not your own SQL server |
It's recommended to use Powershell as terminal for the following instructions. |
On your offline server, please follow the instructions.
Configure your anti-virus software, by following the Docker instructions and exclude the processes dockerd.exe, dotnet.exe, erl.exe and node.exe too.
Copy the archive into the folder C:\ROOMZ.
Unzip the archive and import the images by executing the following commands where the images are.
Code Block docker load -i redis.tar docker load -i mssql.tar docker load -i rabbitmq.tar docker load -i identity-server.tar docker load -i frontend-api.tar docker load -i device-api.tar docker load -i viewer.tar docker load -i proxy.tar docker load -i scheduler.tar
We assume that ALL next commands will be executed in the working directory C:\ROOMZ.
ROOMZ needs an SMTP server to send the invitations to the new users created in the portal, you can use our small tool dockerized to test your credentials before adding them in the configuration file.
Update the file .env by updating the placeholders { } with your credentials (username, password, etc.) and remove the ones you don't use.
To start the ROOMZ environment for the first time, type the command.
Code Block docker-compose up -d --force-recreate --abort-on-container-exit --remove-orphans
ROOMZ is Live !
Troubleshooting
By default, docker is not configured to limit the log files created by the running container, you have to configure it to limit the files created and their sizes.
For the other potential issues, please check the docker troubleshooting page: https://docs.docker.com/docker-for-windows/troubleshoot/
Licenses
NGINX: https://www.nginx.com/products/nginx/#compare-versions
RabbitMQ: https://github.com/rabbitmq/rabbitmq-server/blob/master/LICENSE-MPL-RabbitMQ
Windows Containers: https://docs.microsoft.com/en-us/virtualization/windowscontainers/about/faq#how-are-containers-licensed-is-there-a-limit-to-the-number-of-containers-i-can-run
Backup
To back up the important data, please save the folder on C:\ROOMZ all required data are in this folder. If you would like to have a fast backup, we would recommand to use a full backup via snapshot on the virtual machine